Installation
Split rings are installed using a unique, two part grooving tool. The cutting head cuts the grooves into the wood and the pilot makes sure the rings are centered on the hole. Two bolts on the underside of the head allow for the depth of the hole to be adjusted. Without using the tool, it is impossible to guarantee that the rings can be installed properly.
This 1:53 video shows the proper technique to cut grooves into timber members for split rings. While we use a drill press, you can use a heavy duty ¾” or larger portable drill. This video uses a 4” diameter split ring, however the process is the same for a 2½” split ring.
Step-by-Step Installation InstructionsView Printer Friendly PDF
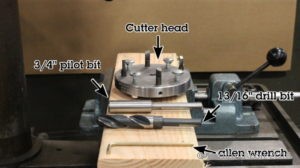 You will need:
- 4” split ring
- Grooving Tool (kit) including:
- Allen wrench
- ¾” Pilot
- Cutter Head
- 13/16” drill bit (not included with Grooving Tool kit)
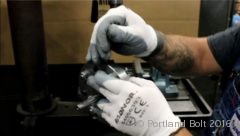 1. Assemble the ¾” pilot into the cutter head and tighten with the Allen wrench. Set the tool aside for now. (All of these parts are included with your grooving tool purchase)
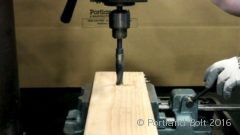 2. Drill a 13/16” hole in the wood for your bolt. We are demonstrating with a drill press, but a heavy duty ¾” or larger handheld drill will work. (A drill bit is not included with your grooving tool, but should be readily available at your local hardware store).
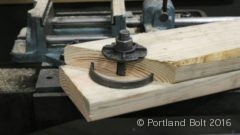
 3. Insert the grooving tool into your drill or drill press. Use the pilot bit to align the cutter head with the pilot hole. The small cap screws on the face of the cutter head can be adjusted to change the depth of the grooves
4. If your split rings are sitting too high in the grove, you can adjust the height of the tool to correct this issue. (It is recommended to start with the shallowest possible grove to test, and adjust deeper if needed). The rings should engage half way into each wood member.
 5. In this example, a split ring is installed between two wooden members. The edge of the board has been cut away for demonstration purposes to show the connection.